Attribute Tools#
Attribute tools are used to create and modify attributes, and attribute values.
Set Attribute Details#
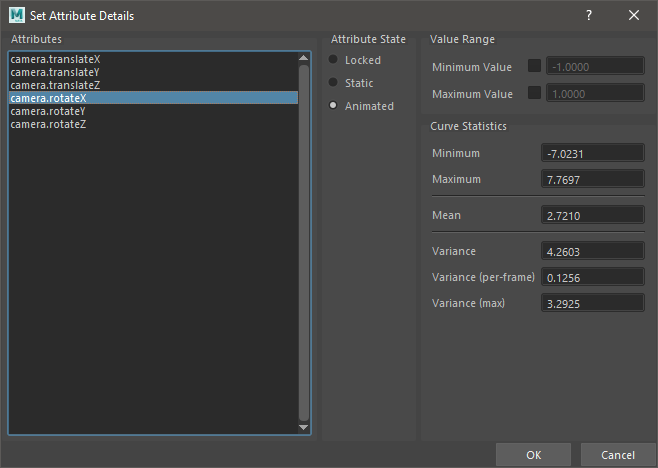
The Attribute Details tool is used to add details (properties) to an individual Attribute. Details are stored per-collection, therefore a Collection must exist to use the tool.
This tool can be used to:
Set Attribute Details on individual Attributes.
Change Attribute states; to lock an attribute, or set a keyframe on the attribute.
View the current Attribute Details on an Attribute.
View the Animation Curve statistics;
Minimum value of the animation curve.
Maximum value of the animation curve.
Mean (Average) value of the animation curve.
Variance of the total animation curve.
Variance (per-frame) of the animation curve; how much does the animation curve change per-frame.
Attribute Details are used by mmSolver to ensure properties are maintained while solving. See the Solver Design Attribute Details page for more information.
Usage:
Ensure a Collection exists.
Open Solver UI, and create Collection node with menu; File > New Collection.
Select nodes (and attributes in channel box, if required).
Open Set Attribute Details UI.
Select an Attribute (left-hand side) and modify the Details (right-hand side).
Click ‘Ok’ to accept the changes.
Run this Python command:
import mmSolver.tools.setattributedetails.tool as tool
tool.open_window()
Smooth Keyframes#
Smooth the selected keyframes in the Graph Editor, along with a UI to change the affect of the Smoothing function. The UI values are saved into the home directory and will be re-used when a new Maya session is opened.
The Smooth Keyframes tool allows smoothing of only specific keyframes, even if the curve is not baked per-frame. The tool will also attempt to control the smoothed values as they blend into unsmoothed values. This allows smoothing a specific area of an animation curve, while preserving other parts and avoiding bumps at the boundry.
Usage:
Use the menu
mmSolver > Attribute Tools > Smooth Keyframes UI.Edit the options in the UI.
Function controls the type of smoothing that is calculated.
Smooth Width controls how much the smoothing function will be applied. The width is number of frames to be used for smoothing, for example a value of 1 means “no smoothing”, a value of 2 means “use previous and next frame”, and 5 means “use previous 4 and next 4 frames”.
Select keyframes in Graph Editor.
Run ‘Smooth Selected Keyframes’ tool.
Keyframe values will be smoothed.
Repeat steps 3 to 5 as required.
You can use the below Python code on a hotkey of your choosing. To run the tool, use this Python command:
import mmSolver.tools.smoothkeyframes.tool as tool

# Smooth the selected Keyframes
tool.smooth_selected_keyframes()

# Open the Smooth Keyframes UI.
tool.main()
Blend Width#
When the Smooth Keyframes tool is run the selected keyframes are smoothed as well as frames surrounding the selected keyframes. The surrounding keyframes are blended together with the smoothed keyframes. The Blend Width value controls the number of frames to blend.
The image below shows the effect of the Blend Width value.
Function Average#
The Average smoothing function will average the surrounding keyframe values equally.
The image below shows the effect of the Smooth Width with the Average function.

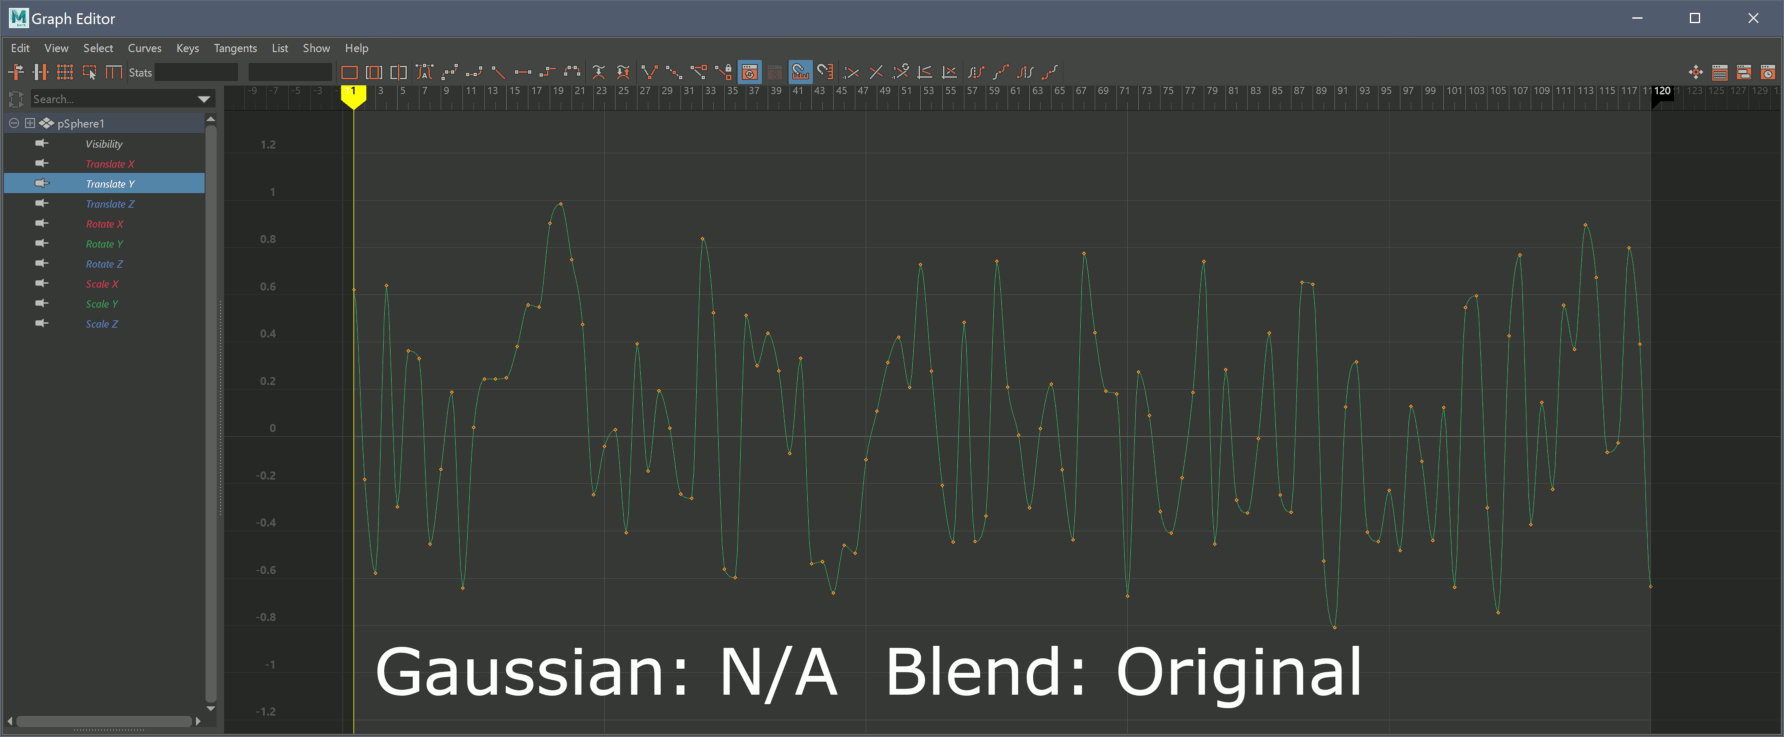
Function Gaussian#
The Gaussian smoothing function performs a strong smooth on the keyframes. The Gaussian function can be used to make a curve very flat, without any changes. Unlike the Fourier function, the Gaussian function will change already smooth keyframes.
This function is similar to 2D image Gaussian blurring.
The image below shows the effect of the Smooth Width with the Gaussian function.

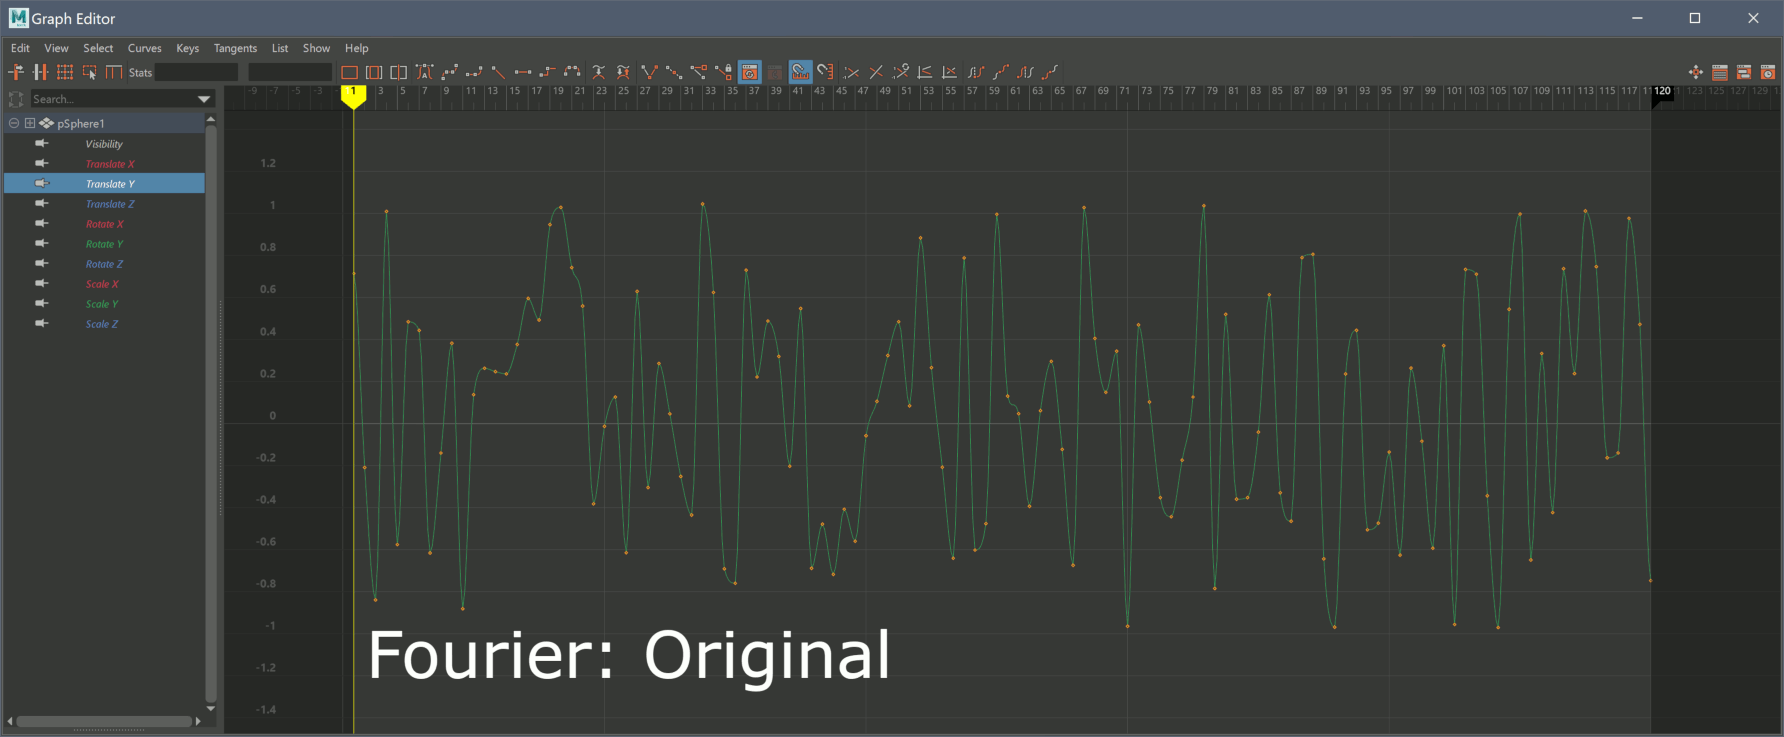
Function Fourier#
The Fourier smoothing function performs a high-pass-filter to the selected keyframes. Keyframes with rapid changes are smoothed more than already smoothed values.
This function is similar to 2D image high-pass filtering techniques, to remove high-contrast edge detail.
The image below shows the effect of the Smooth Width with the Fourier function.
Channel Sensitivity#
Channel sensitivity tool helps you to change the value of sensitivity of channel slider setting. Using this tool the user to adjust attributes in the Channel Box by very small increments, which is useful for manually adjusting or matching parameters interactively.
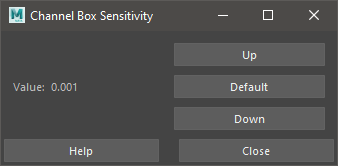
Usage:
Run tool.
A UI will open, click the Up or Down buttons to change the sensitivity.
Select an Attribute in the Channel Box.
Middle-mouse drag in the viewport to change the attribute value.
To run the tool, use this Python command:
import mmSolver.tools.channelsen.tool as tool
tool.main()
Bake Attributes#
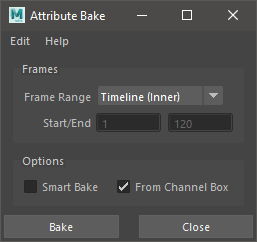
Bake Attributes will bake the values of an attribute on each frame and replace the connection with an animation curve.
This tool is almost identical to the default Maya Edit > Keys > Bake
Simulation tool, but has additional features.
The viewport is always disabled while baking.
The tool is optimised for speed of baking.
The tool UI is reduced to only the nessarary features for matchmove tasks.
Usage:
Select 1 or more nodes.
Select attributes in channel box (if required).
Open Bake Attributes UI.
Enable the Smart Bake to set keyframes only on some keyframes.
Disable From Channel Box to bake all keyable attributes, not just the selected attributes.
Press Bake button.
Note
In Maya scenes that rely on legacy viewport update for
correct evaluation, this tool may produce incorrect results
(because the viewport is disabled). If this happens, please
use Maya’s default Edit > Keys > Bake Simulation tool. In
the experience of the tool authors, this has never happened
and this tool is a faster baking tool.
Run this Python command:
import mmSolver.tools.attributebake.tool as tool
tool.open_window()

# To run the "fast bake" tool directly (with currently set
# options).
tool.main()
Attribute Curve Filter Pops#
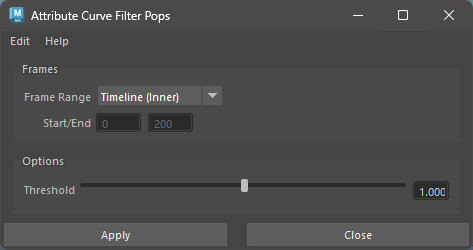
The Attribute Curve Filter Pops tool is used to detect and remove unwanted spikes or “pops” in animation curves. These sudden value changes can occur during animation or when solving, and this tool helps smooth them out while preserving the intended animation.
For example, after solving a camera with noisy tracking data, you may get small value spikes/pops in the animation curves. This tool can help remove those spikes.
The tool works by analyzing each keyframe and comparing the value changes between neighboring frames. When the change exceeds the specified threshold, it’s identified as a pop and filtered out.
Usage:
Select nodes with animation curves.
The tool will look for selected attributes in the Channel Box.
Or selected Graph Editor Outliner attributes.
Or selected keyframes in the Graph Editor.
Open the Attribute Curve Filter Pops UI:
Menu:
mmSolver > Attribute Tools > Attribute Curves Filter Pops
Configure the options:
Set the frame range to process.
Adjust the threshold value that determines what constitutes a “pop”.
Click “Apply” to filter the animation curves.
The tool will apply to multiple attributes at once.
Python Command:
import mmSolver.tools.attributecurvefilterpops.tool as tool

# Run the filter with current settings
tool.main()

# Open the UI window
tool.open_window()
Notes#
The tool requires animation curves on the attributes to filter. If attributes aren’t animated, bake them to animation curves first.
The threshold determines what constitutes a “pop” - experiment with different values to find what works best for your animation.
Use the Graph Editor to visually inspect the results after filtering.
All operations can be undone if needed.
For general animation curve smoothing (rather than spike removal), consider using the Smooth Keyframes tool instead.
Options#
Frame Range - Choose how to determine which frames to process:
Timeline (Inner) - Uses the inner timeline range (highlighted region)
Timeline (Outer) - Uses the outer timeline range
Custom - Manually specify start/end frames
Start/End - When “Custom” frame range is selected, specify the exact frame range to process
Threshold - Controls how aggressively pops are detected and filtered:
Default value is 1.0,
Higher values (above 1.0) remove less pops, only fixing large spikes.
Lower values (below 1.0) remove more pops, smoothing out smaller variations.
For typical matchmove solves, however values between 0.5 and 1.5 work well.
Attribute Curve Simplify#
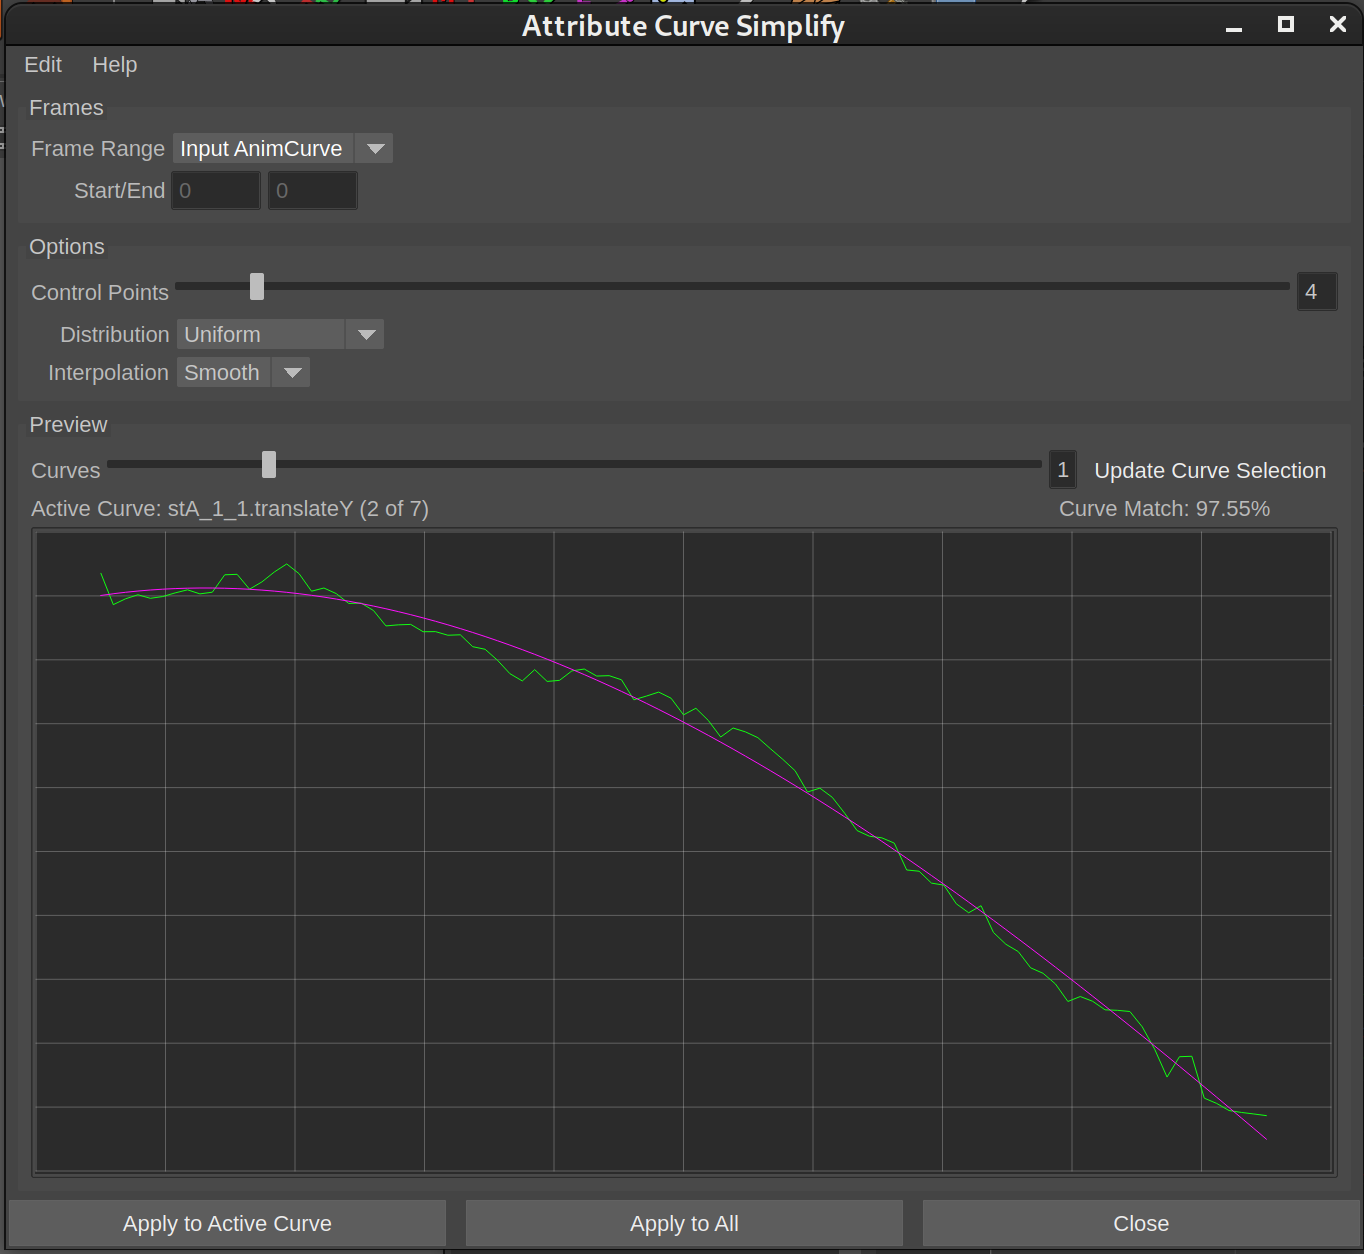
The Attribute Curve Simplify tool reduces the number of keyframes in animation curves while preserving their overall shape and motion. This tool is particularly useful for optimizing dense animation data from solves or imported motion capture, creating cleaner curves that are easier to edit and perform better in Maya.
The tool uses curve fitting algorithms to create simplified curves with a specified number of control points. It provides a real-time preview showing both the original and simplified curves, along with a quality-of-fit percentage indicating how closely the simplified curve matches the original animation.
For example, after solving a camera with dense per-frame keyframes, you can use this tool to reduce hundreds of keyframes down to just a few control points while maintaining the essential motion characteristics.
Usage:
Select nodes with animation curves.
The tool will look for selected attributes in the Channel Box.
Or selected Graph Editor Outliner attributes.
Or selected keyframes in the Graph Editor.
Open the Attribute Curve Simplify UI:
Shelf / Menu:
mmSolver > Attribute Tools > Simplify Animation Curve
Configure the options:
Set the frame range to process.
Adjust the number of control points for the simplified curve.
Choose the distribution method and interpolation type.
Preview the results:
Use the curve display to compare original vs simplified curves.
Check the quality-of-fit percentage for each curve - 100% is perfect match.
Apply the simplification:
Click “Apply to Active Curve” for the currently previewed curve.
Click “Apply to All” to process all selected curves at once.
Python Command:
import mmSolver.tools.attributecurvesimplify.tool as tool

# Simplify curves with current settings.
tool.main()

# Open the UI window.
tool.open_window()
Notes#
The tool requires animation curves on the attributes to simplify. If attributes aren’t animated, bake them to animation curves first.
The simplified curves replace the original animation data. Use Maya’s undo feature if you need to revert changes.
All operations can be undone if needed.
Higher numbers of control points preserve more detail but result in less simplification.
The “Auto Keypoints” distribution mode automatically detects important keyframes to preserve, while “Uniform” spacing distributes control points evenly across the time range.
Quality-of-fit percentages above 95% typically indicate excellent curve approximation.
For curve spike removal (rather than keyframe reduction), consider using the Attribute Curve Filter Pops tool instead.
Options#
Frame Range - Choose how to determine which frames to process:
Input AnimCurve - Uses the full frame range of each animation curve.
Timeline (Inner) - Uses the inner timeline range (highlighted region).
Timeline (Outer) - Uses the outer timeline range.
Custom - Manually specify start/end frames.
Start/End - When “Custom” frame range is selected, specify the exact frame range to process.
Control Points - Number of control points for the simplified curve:
Range: 2-32 control points.
Default: 3 control points.
More points preserve more detail but reduce simplification.
Fewer points create smoother curves but may lose important motion details.
Distribution - Method for positioning control points:
Uniform - Evenly spaces control points across the time range.
Auto Keypoints - Automatically detects and preserves important keyframes.
Interpolation - Curve fitting method:
Linear - Creates linear segments between control points.
Smooth - Uses smooth interpolation (better for organic motion).