General Tools#
The tools on this page are not specific to Markers, Cameras or Bundles, but are general tools useful in Maya for many different tasks.
Reparent Under Node#
This is equivalent to Maya’s Parent tool (p hotkey), except the tool will maintain the world-space position of the transform node for each keyframe applied to the node.
See the Reparent UI for options.
Usage:
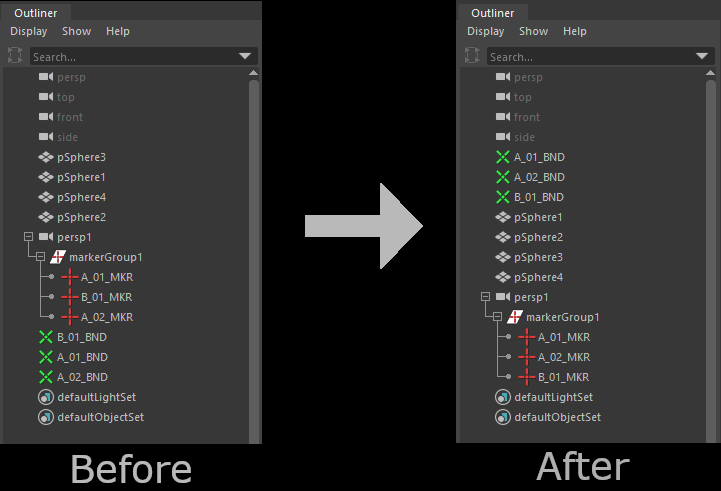
Select nodes to change parent, then select the new parent node.
The first nodes will become the children of the last selected node.
The last node is the new parent.
Run tool.
The first nodes are now parented under the last selected node, and will stay in the same position in world-space for all keyframes.
To run the tool, use this Python command:
import mmSolver.tools.reparent2.tool as tool
tool.reparent_under_node()
Unparent to World#
This is equivalent to Maya’s Unparent tool (Shift + p hotkey), except the tool will maintain the world-space position of the transform node for each keyframe applied to the node.
See the Reparent UI for options.
Usage:
Select Maya transform node(s).
The nodes may be in a deep hierarchy, or not.
Run tool.
The nodes will maintain the same world-space position, but will be unparented into root Maya Outliner (the nodes will not be parented under any node).
To run the tool, use this Python command:
import mmSolver.tools.reparent2.tool as tool
tool.unparent_to_world()
Reparent UI#
This window displays options for how to re-parent nodes.
Reparent is the underlying tool window used by both Reparent Under Node and Unparent to World.
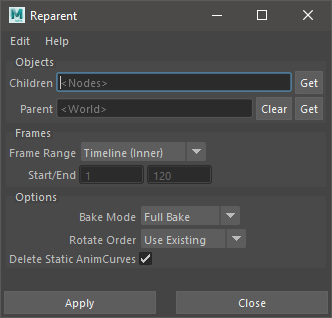
Name |
Values |
Description |
|---|---|---|
Children |
Node Names |
Description |
Parent |
Node Name or empty |
The node to place children underneath. |
Frame Range |
Timeline (Inner), Timeline (Outer) or Custom |
The frame range to bake. |
Bake Mode |
Full Bake or Smart Bake |
Method for how keyframes are baked. |
Rotate Order |
Use Existing or XYZ, ZXY, etc |
Change the rotation order of children nodes when re-parenting. |
Delete Static AnimCurves |
Yes or No |
Baked attributes that do not animate have all keys replaced with a static value. |
This video tutorial explains how the re-parenting tool works.
To run the tool, use this Python command:
import mmSolver.tools.reparent2.tool as tool
tool.open_window()
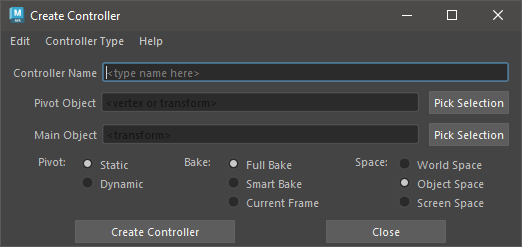
Create / Remove Controller#
Create a new transform node to control another node. The Controller transform node can have a separate hierarchy than the source node.
The UI for this tool can be used control the baking method, and the ‘space’ of the created controller. These features create a very powerful workflow for editing, and solving characters and objects.
Note
For a simple, straight-forward tool to create a world-space controller for each selected object, use the Create (World-Space) Controllers tool.
Usage:
Select a Maya transform node.
Open ‘Create Controller’ tool UI.
Type a name for the controller.
Select your pivot object and press Pick Selection.
Select your main object and press Pick Selection.
Select your options for Type, Pivot, Bake mode, and Space.
Use the Controller Type menu to change the node types created for the controller. Choose “Group” if you do not like to see locators in your viewport.
Pivot changes how the pivot object is baked; Static assumes the pivot object does not animate or is baked on the current frame. Dynamic uses an animated pivot.
Bake changes the method used to bake keyframe times. Choose Full Bake to bake every frame, and choose Smart Bake to bake some frames.
Space changes the heirachy and orientation of the Controller nodes. Using Screen Space allows you to move an object in screen-space, with X and Y the position on the screen, and Z the depth into the screen. This can be very helpful for smoothing Z-bumps and depth problems.
Press Create Controller button.
A new Controller node is created at the same position as the pick object.
Select and move the created Controller as you wish.
Select the Controller, run Remove Controller tool.
The source node is baked and the Controller node is deleted.
To run the tool, use this Python command:
import mmSolver.tools.createcontroller2.tool as tool
tool.open_window()
To create world-space controllers for the current selection, without using any of the UI options, use this Python command:
import mmSolver.tools.createcontroller2.tool as tool
tool.create_world_controllers()
To remove a controller, use this Python command:
import mmSolver.tools.removecontroller2.tool as tool
tool.main()
The tool described above is “version 2”, for the older (less featured) version 1, use this python code to run it.
import mmSolver.tools.createcontroller.tool as tool

# Create a Controller
tool.create()

# Remove selected Controller
tool.remove()
Create Rivet#
Create a transform locator node that follows the surface of a Mesh, i.e. the transform is ‘riveted’ to the mesh.
There are two types of rivet types currently supported:
Mesh Two Edges rivets are created from 2 Mesh shape edge components, the same as using the classic rivet.mel script. If the topology of the underlying mesh changes, the rivet will move across the surface.
Point On Poly Constraint rivets are created at selected vertices and can be moved along the surface with the UV coordinates. If the UV coordinates of the underlying mesh changes, the rivet may move. This rivet-style will not work with UV coordinates outside the regular 0.0 to 1.0 UV space as is commonly used with texture UDIMs.
Usage:
Select a Maya Mesh components.
Select Mesh Vertices to create Point On Poly Constraint rivets.
Select 2 Mesh Edges to create a single Mesh Two Edges rivet.
Run tool.
A rivet locator will be created.
For a Point On Poly Constraint rivet, you can adjust the U and V coordinates from the rivet locator, if needed.
To run the tool, use this Python command:
import mmSolver.tools.createrivet.tool as tool
tool.main()
Surface Cluster#
A Surface Cluster is a “cluster” deformer that will be riveted to the surface of a mesh object. All movement of the underlying surface is inherited by the Surface Cluster, so the cluster “sits on” the surface, even if the underlying surface is animated/deformed.
Surface Clusters can be very helpful for subtly adjusting the silhouette of an object, or adding a bulge, especially when the change needs to be animated.
Note
This old Surface Cluster YouTube Video shows the general usage of the tool, however the tool has been re-written and improved with features for editing the deforming weights.
Create Single Surface Cluster#
Create a Surface Cluster on the selected Mesh component.
Usage:
Select 1 or more components (vertices, edges, faces, etc).
Run this tool.
create a single surface cluster at the average position of all selected components.
(Optionally) Use current Soft Selection as default weighting - the same as the “update_weights_with_soft_selection” tool.
To run the tool, use this Python command:
import mmSolver.tools.surfacecluster.tool as tool
tool.create_single_surface_cluster()

# Open the UI window change settings before creation.
tool.open_window()
Create Multiple Surface Cluster#
Create multiple surface clusters, one for each component selected.
Usage:
Select 1 or more components (vertices, edges, faces, etc).
Run this tool.
For each component, create a surface cluster is created.
To run the tool, use this Python command:
import mmSolver.tools.surfacecluster.tool as tool
tool.create_multiple_surface_clusters()

# Open the UI window change settings before creation.
tool.open_window()
Update Weights With Soft-Selection#
Update the cluster deformer weights using the current component soft-selection.
Usage: 1) Enable Soft Selection (‘b’ hotkey)
Select 1 or more components (vertices, edges, faces, etc).
Select surface cluster control.
Run this tool.
The weights of the surface cluster are updated with the soft selection.
To run the tool, use this Python command:
import mmSolver.tools.surfacecluster.tool as tool
tool.update_weights_with_soft_selection()
Open Surface Cluster Paint Weights#
Open the paint weights tool for the selected surface cluster Control.
Usage: 1) Select a surface cluster control.
Run tool.
The paint weights tool is opened.
User paints weights.
To run the tool, use this Python command:
import mmSolver.tools.surfacecluster.tool as tool
tool.open_paint_weights_tool()
Marker Bundle Rename#
Renames selected markers and bundles connected, takes the input name given in prompt window.
Usage:
Select Marker (or Bundle) nodes.
Run tool.
A prompt is displayed to enter the new name for the Marker and Bundles.
If the prompt is left at the default value
marker, then the Markers will namedmarkerand Bundles will be namedbundle.
To run the tool, use this Python command:
import mmSolver.tools.markerbundlerename.tool as tool
tool.main()
Marker Bundle Rename (with Metadata)#
Renames the selected Markers and Bundles using only the metadata saved onto the Marker nodes.
For example, metadata from 3DEqualizer is saved onto the Marker node.
Usage:
Select Marker (or Bundle) nodes.
Run tool.
Markers and Bundles are renamed based on metadata, if metadata is not found, the Marker/Bundle is not renamed.
To run the tool, use this Python command:
import mmSolver.tools.markerbundlerenamewithmetadata.tool as tool
tool.main()
Sort Selected Nodes In Outliner#
Alphabetically sorts (re-orders) the selected nodes in the Maya Outliner window.
This tool avoids the Maya Outliner window’s (interactive) “Sort Order” feature and encourages an organised workflow when working with many nodes.
This tool works on any Transform node, not only mmSolver nodes.
Usage:
Select transform nodes.
Run tool.
The nodes will be sorted.
To run the tool, use this Python command:
import mmSolver.tools.sortoutlinernodes.tool as tool
tool.main()
Remove Solver Nodes#
Remove Solver Nodes tool allows for the removal of some or all nodes related to the matchmoveSolver plugin, allowing for a clean scene to be prepped to passed to other departments/vendors.
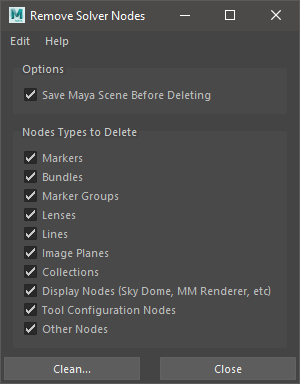
Usage:
Run tool.
A UI will open.
Select what type of nodes you wish to remove.
Click ‘Clean’.
Note that if there are other nodes constrained or connected in some way to the marker or bundle nodes they should be cleaned or baked before removal.
To run the tool, use this Python command:
import mmSolver.tools.removesolvernodes.tool as tool
tool.main()
Image Cache Preferences#
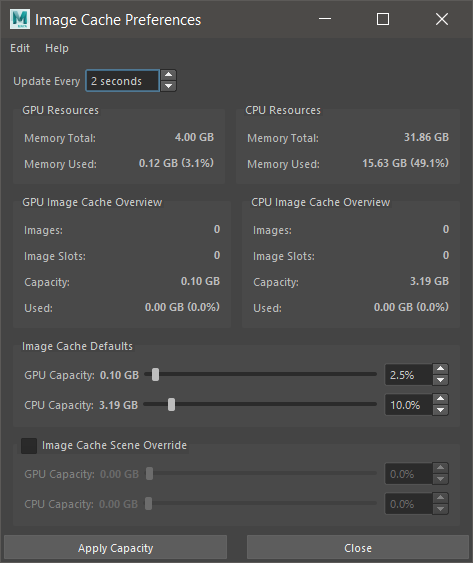
The Image Cache Preferences control how much memory MM Solver is allowed to use to store image data, and displays real-time information about memory consumption of the computer hardware resources; both CPU and GPU memory.
The MM ImagePlane uses the Image Cache to store all image data.
The Image Cache Preferences have defaults and scene override options. The default options are used when Maya is started, and new Maya scenes are created. The scene override options are used when the current Maya scene is opened; these only apply to the current Maya scene and are useful when you wish to adjust a specific scene with exceptional requirements without adjusting your regular default options.
Note
The Image Cache Preferences only control the capacity of images loaded by MM Solver. Other types of data in Maya like geometry and material/surface textures are not controlled or detailed.
To run the tool, use this Python command:
import mmSolver.tools.imagecacheprefs.tool as tool
tool.open_window()
What Image Cache Values Should I Use?#
The Image Cache Capacity values are depending on two things; hardware memory capacity and frame count / image resolution. This section lists some common wisdom and logic to optimise the use of the Image Cache.
The default Image Cache Preferences are intended for a user with a ~200 frame 1080p HD shot, 4 GB of GPU memory and 32 GB CPU memory. The hardware specifications for a professional workstation in 2024 is expected to surpass these values, but this assumption is intended to ensure that lower-spec hardware still performs okay.
If you don’t care about MM ImagePlane playback speed; set the Image Cache capacity to 0%.
If you want the maximum performance and you have a lot of GPU and CPU memory, and you only work with one Maya Scene open at once; set the Image Cache capacity to 100%
If you want to fit the image sequence of an MM ImagePlane, look at the Image Cache tab in the Attribute Editor, and set your GPU and CPU Image Cache capacity to just above that number.
If you are often running out of GPU memory, decrease your GPU memory capacity to 0% or the lowest possible - you may get a limited playback speed (depending on the image resolution), however the Image Cache will only keep 1 image in GPU memory at any one time - at the cost of slower playback.
Hardware Resource Monitor#
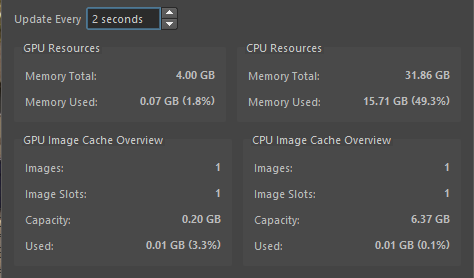
The Image Cache Preferences window allows users to monitor the computer’s memory resources similar to the Microsoft Windows Task Manager or System Monitors on Linux. Additionally the window provides details of the Image Cache memory usage, detailing how many individual Images are stored and how many Image Slots (similar to image sequences) are stored.
Note
The Image Cache Capacity and Used values only display statistics of memory of the Image Cache; geometry and material/shader textures are not counted.
Field |
Description |
Measurement Unit |
|---|---|---|
Memory Total |
Total amount of memory of the hardware resource. |
Gigabytes (GB) |
Memory Used |
Amount of memory available for the hardware resource. |
Gigabytes (GB) |
Field |
Description |
Measurement Unit |
|---|---|---|
Images |
Number of individual images stored in the Image Cache on the hardware. |
Count |
Image Slots |
Number of unique image sequences stored in the Image Cache on the hardware. |
Count |
Capacity |
Amount of hardware memory allowed to be used for the Image Cache. |
Gigabytes (GB) |
Used |
Amount of Image Cache capacity used. |
Gigabytes (GB) / Percentage of Capacity |
User Preferences#
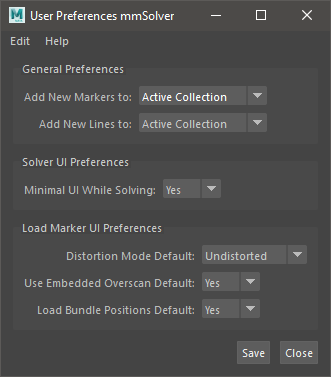
The User Preferences window is used to change how mmSolver tools and general functions behave, by default.
Name |
Values |
Description |
|---|---|---|
Add New Markers to |
None or Active Collection |
When a new Marker is created by any tool, what Collection should this Marker be automatically added to? |
Add New Lines to |
None or Active Collection |
When a new Line is created by any tool, what Collection should this Line be automatically added to? |
Minimal UI While Solving |
Yes or No |
If Yes, the Solver UI will only display the progress bar while solving, and then switch back to the full UI solving has finished. If No, the Solver UI will not be adjusted. |
Solver Options |
Default or Developer |
If set as Developer, the Solver UI will display extended options intended for users testing or experimenting with new features, or for developers of mmSolver.. |
Rename Markers Default |
Yes or No |
Controls the default value used for the “Rename Markers” option in the Load Markers UI. |
Distortion Mode Default |
Undistorted or Distorted |
Controls the default value shown in the Load Markers UI. |
Use Embedded Overscan Default |
Yes or No |
Controls the default value shown in the Load Markers UI. |
Load Bundle Positions Default |
Yes or No |
Controls the default value shown in the Load Markers UI. |
Bundle Space Default |
Local-Space or World-Space |
Controls the default value shown in the Load Markers UI. |
Usage:
Open ‘User Preferences’ window.
Change options.
Press “Save” button.
To run the tool, use this Python command:
import mmSolver.tools.userprefswindow.tool as tool
tool.open_window()