Display Tools#
The tools on this page are not specific to Markers, Cameras or Bundles, but are general tools useful in Maya for many different tasks.
Center 2D On Selection#
Forces the active viewport camera to lock it’s center to the currently selected transform nodes, or mesh node components (face, edge, vertex). The Center 2D Offset window can be used to offset the 2D offset horizontally/vertically.
While centering is turned on, it overrides Maya’s normal 2D Pan/Zoom settings.
Usage to apply the centering effect:
Select transform nodes, or mesh node components (face, edge, vertex).
Activate a 3D viewport.
Run Apply 2D Center tool.
The active viewport camera will be centered on the selected objects and components.
Use the Pan/Zoom tool (default hotkey is backslash (
\) key), to zoom in and out. Play the Maya timeline and use the centered view as needed.With the
mmSolverHotkey Set enabled, press thezkey to use the Maya-native Pan/Zoom tool.
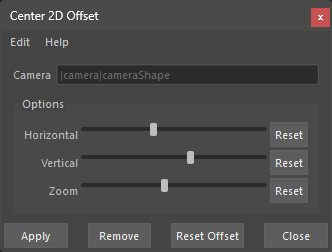
Click on the ‘Apply 2D Center’ menu option box to display the ‘Center 2D Offset’ window.
Drag the Horizontal, Vertical and Zoom sliders to offset the 2D centering.
Click ‘Apply’ button to apply the Center 2D.
Click ‘Remove’ button to remove the Center 2D.
Click ‘Reset Offset’ button to reset all the 2D offsets.
Click ‘Close’ button to close the window.
Usage to remove centering effect:
Run Remove 2D Center tool.
The active viewport will no longer center on an object, but will not reset the view.
The pan/zoom will still be active. To reset the viewport camera, turn off Pan/Zoom on the viewport camera (default hotkey is backslash (
\) key).With the
mmSolverHotkey Set enabled, press thezkey to use the Maya-native Pan/Zoom tool.
To run the tool, use this Python command:
import mmSolver.tools.centertwodee.tool as tool

# Apply Centering onto active camera
tool.main()

# Remove Centering from active camera
tool.remove()
Cycle Viewport Display Preset#
The Cycle Viewport Display Preset tool will change between a list of three display presets; Silhouette (with Hold-Outs), Hidden-Line (with Hold-Outs) and All Shaded. The goal of the tool is to quickly swap between different ways of visualizing your Maya scene.
Note
The Cycle Viewport Display Preset tool is intended to be used with the Set Mesh Hold-Outs tool, to set your objects for hold-out rendering.
Usage:
Select a Maya Viewport panel.
Run the Cycle Forwards/Backwards tool.
Use the Display Tools shelf button pop-up menu, or mmSolver menu, or the hotkey to run the tool.
With the
mmSolverHotkey Set enabled, press the ` (backtick) key or ALT + ` (backtick) key to cycle forwards or backward through the presets.The ` (backtick) key is next to the
1key on US, US-international and UK keyboards.
The display presets are:
Name |
Description |
|---|---|
Silhouette (with Hold-Outs) |
Displays Silhouette edges with hold-out geometry. |
Hidden-Line (with Hold-Outs) |
Displays Hidden-Line (wireframe) edges with hold-out geometry. |
All Shaded |
Displays all geometry as shaded, and disables hold-out rendering. |
To run the tool, use this Python command:
# Run the cycle tool; forwards or backwards.
import mmSolver.tools.setviewportdisplaypreset.tool as tool
tool.active_viewport_cycle_forward()
tool.active_viewport_cycle_backward()

# Alternatively, you can set a preset by name.
import mmSolver.tools.setviewportdisplaypreset.constant as const
tool.set_active_viewport_display_preset(const.SILHOUETTE_DISPLAY_PRESET_NAME)
tool.set_active_viewport_display_preset(const.HIDDEN_LINE_DISPLAY_PRESET_NAME)
tool.set_active_viewport_display_preset(const.ALL_SHADED_DISPLAY_PRESET_NAME)
Toggle Viewport Node Types#
There are a range of Toggle Viewport tools that are used to hide/show groups of node types.
Node type groups include:
Show/Hide geometry in the current viewport.
Show/Hide Locators and NURBS Curves in the current viewport.
Show/Hide Image Planes in the current viewport.
Usage:
Activate a 3D Viewport.
Run tool.
The node type visibility will be shown/hidden based on the current visibility.
With the
mmSolverHotkey Set enabled, press theALT + 1(Geometry),ALT + 2(Curves and Controls),ALT + 3(Image Planes) to toggle the respective node types.
Each different group can be activated with a slightly different Python command.
# Toggle Viewport Geometry (Mesh, NURBS, etc):
import mmSolver.tools.toggleviewportgeom.tool as tool
tool.main()

# Toggle Viewport Controls: (Locators, Curves, etc)
import mmSolver.tools.toggleviewportctrls.tool as tool
tool.main()

# Toggle Viewport Image Planes (Maya native and MM solver image planes):
import mmSolver.tools.toggleviewportimgplns.tool as tool
tool.main()

# Alternatively, a user can construct their own custom scripts to
# control visibility like so:
import mmSolver.utils.viewport as viewport_utils
model_panel = viewport_utils.get_active_model_panel()
if model_panel:
    value = viewport_utils.get_locator_visibility(model_panel)
    new_value = not value
    viewport_utils.set_locator_visibility(model_panel, new_value)
See mmSolver.utils.viewport Python module documentation for more help.
Set Mesh Hold-Outs#
This tool is used to force mesh nodes to be rendered as hold-out in the viewport, or not.
This is similar to assigning a useBackground shader, to geometry, however this tool avoids the need to create a shader, and manage assignments.
The tool is split into different individual features which are fairly self-explanatory:
Enable / Disable Hold-Outs on selected meshes.
Enable / Disable Hold-Outs on all Meshes in the scene.
Usage:
Select meshes (optional)
Run tool.
Meshes will be have the Hold-Out attribute enabled / disabled.
Each different feature can be activated with a slightly different Python command.
# Enable Hold-outs on Selected Meshes:
import mmSolver.tools.setmesholdouts.tool as tool
tool.enable_selected_meshes()

# Disable Hold-outs on Selected Meshes:
import mmSolver.tools.setmesholdouts.tool as tool
tool.disable_selected_meshes()

# Enable Hold-outs on All Meshes:
import mmSolver.tools.setmesholdouts.tool as tool
tool.enable_all_meshes()

# Disable Hold-outs on All Meshes:
import mmSolver.tools.setmesholdouts.tool as tool
tool.disable_all_meshes()
Create Horizon / Axis Dome / Sky Dome#
MM Solver includes a flexible Sky Dome node that can be used to visualize the rotations of a camera with lines.
Simply create the Sky Dome, Axis Dome or Horizon to create a
mmSkyDomeShape node, then you can edit the attributes in the
Attribute Editor.
Set the Draw Mode and Radius attributes to control how the depth of Sky Dome.
Set the Alpha and Line Width attributes to easily adjust the brightness of the lines.
Enable Anti-Aliasing in Maya Viewport 2.0 to see the lines with better quality.
By default the centre of the Sky Dome will always be positioned to your visible camera - it will “dynamically attach” to your camera in each viewport.
The Sky Dome is not renderable in software renders (like Arnold), it only supports Viewport 2.0.
To run the tool, use this Python command:
import mmSolver.tools.createskydome.tool
import mmSolver.tools.createskydome.constant as const

# Create Sky Dome
mmSolver.tools.createskydome.tool.main(preset_name=const.PRESET_SKY_DOME_NAME)

# Create Axis Dome
mmSolver.tools.createskydome.tool.main(preset_name=const.PRESET_AXIS_DOME_NAME)

# Create Horizon Line
mmSolver.tools.createskydome.tool.main(preset_name=const.PRESET_HORIZON_LINE_NAME)
Set Object Colour / Reset Object Colour#
The Set Object Colour tools can be used to override the wireframe colour of the selected objects.
Likewise to remove the colour overrides, use the Reset Object Colour to reset selected objects.
This tool works on common Maya shape nodes, such as Meshes, NURBS Surfaces, and NURBS Curves, as well as MM Solver shape nodes, like Markers, Bundles and Lines.
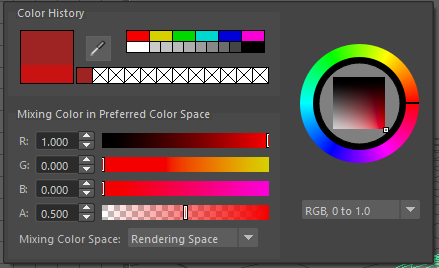
Note
Starting with Maya 2023 the Set Object Colour UI contains an Alpha channel value, allowing the wireframe to be transparent.
Usage - Set Colour:
Select object(s).
Run tool.
Choose colour.
Move mouse away from window to set and close the colour.
Usage - Reset Colour:
Select object(s).
Run tool.
All selected objects have colour overrides removed back to default colours.
To run the tool, use this Python command:
import mmSolver.tools.setobjectcolour.tool as tool
tool.open_mini_window()

# Or run with the larger window.
tool.open_window()

# Or reset the colour on selected objects.
tool.reset_colour()
Toggle Object Motion Trail#
The Object Motion Trail can be used to view the position of a 3D transform (or object) for a series of frames, using a line. This tool can be used to toggle the Motion Trail to easily create and view.
Usage:
Select Object transform node(s).
Run tool.
If the object has no motion trail, the motion trail will be created or unhidden.
If the object has a motion trail it will be hidden.
To run the tool, use this Python command:
import mmSolver.tools.toggleobjectmotiontrail.tool as tool
tool.main()
Create Screen-Space Motion Trail#
The Screen-Space Motion Trail tool creates a non-editable curve that shows the screen-space position of a transform across multiple frames.
With default options the tool can be used to visualise the shutter time of a Marker (or any other transform), assuming a shutter angle of 180 degrees (half a frame).
The user may change the default options after the motion trail is created by selecting the Motion Trail node under the camera and editing the attributes in the Channel Box.
Beware of small increment values, and large frame ranges. These will cause slow-downs in the playback of the Maya scene.
Attribute |
Type |
Description |
|---|---|---|
Use Frame Range |
On/Off |
Use the frame range, or the pre/post-frame values. |
Pre-Frame |
Number |
The number of frames to display before the current frame. |
Post-Frame |
Number |
The number of frames to display after the current frame. |
Frame Range Start |
Number |
The starting frame number, if Use Frame Range is on. |
Frame Range Start |
Number |
The ending frame number, if Use Frame Range is on. |
Increment |
Number |
The increment for each sample of the motion trail. |
Usage:
Select transform nodes.
Activate viewport.
Run tool.
A temporary null is created (required for the tool to work), and a motion trail parented under the camera is created.
To run the tool, use this Python command:
import mmSolver.tools.screenspacemotiontrail.tool as tool
tool.main()