Marker Tools#
The tools used to manipulate 2D Marker nodes.
Toggle Marker Lock State#
Toggle marker lock state will toggle lock state of the selected marker’s attributes, if any of the marker translate attributes are locked, running this tool will unlock translateX, translateX and enable attributes on the selected markers, and running the tool again will lock same attributes.
Usage:
Select marker nodes.
Run tool.
The selected marker node attributes will be toggled between locked and unlocked.
Run this Python command:
import mmSolver.tools.togglemarkerlock.tool as tool
tool.main()
Place Marker Manipulator#
Place a Marker at a position of a mouse click.
Usage:
Click to active a 3D Maya Viewport containing Marker nodes.
Select one or more Marker nodes in the viewport.
Run tool.
The current tool will change to Place Marker.
Left-click in the viewport to place the Marker node under the mouse.
The user may also hold the left-click button down to move the Marker to a new screen position in real-time.
Run this Python command:
import mmSolver.tools.placemarkermanip.tool as tool
tool.main()
Duplicate Marker#
Duplicate marker tool will create a new markers having same position from the selected markers, this tool will duplicate on all selected markers.
Usage:
Select Marker nodes
Run tool.
New Marker nodes are created as exact copies of the selected Marker nodes.
Run this Python command:
import mmSolver.tools.duplicatemarker.tool
mmSolver.tools.duplicatemarker.tool.main()
Average Marker#
Average Marker tool will create a new Marker with an averaged position between all the selected Markers.
This tool must have at least two Markers selected.
Usage:
Select 1 or more Marker nodes.
Run tool. - A third Marker node will be created between all others.
Run this Python command:
import mmSolver.tools.averagemarker.tool
mmSolver.tools.averagemarker.tool.main()
Convert to Marker#
Converts the selected transform nodes into screen-space Markers, as viewed though the active viewport camera.
The created markers are named based on the selected transform nodes, and are parented under the active viewport camera.
Usage:
Click into an active 3D viewport.
Select one or more Maya transform nodes.
Run tool.
A Marker will be created for each Maya transform node selected, across the current timeline’s frame range.
Run this Python command:
import mmSolver.tools.convertmarker.tool as tool
tool.main()
Project Marker on Mesh (Ray-Cast)#
Ray-casts each bundle connected to the selected markers on to the mesh from the associated camera.
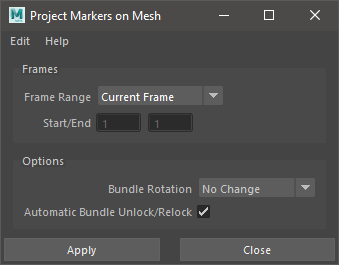
Select markers and mesh objects to ray-cast on to, if no mesh objects are selected the tool will ray-cast on to all visible mesh objects.
If a bundle translate or rotation attribute is locked, it will be unlocked, then projected, and then the lock state will be reverted to the original value.
The viewport camera does not need to be active for this tool to project. The tool will work on the current frame only.
You may choose to change the bundle’s rotation attributes with these options:
Name |
Description |
|---|---|
No Change |
Do not change the bundle rotation attributes at all. |
Aim At Camera |
Aim the bundle rotations towards the camera position. |
Mesh Normal |
Set the bundle rotations to the hit mesh face normal. |
Usage:
Select Markers.
(Optional) Select Mesh nodes.
Selecting Mesh nodes will limit the nodes used for ray-casting computation.
Run tool.
(Optional) Open the UI to adjust options and press Apply.
The Bundles connected to the selected Markers will be projected from the currently active viewport camera onto the mesh in the scene.
Run this Python command:
import mmSolver.tools.raycastmarker.tool as tool
tool.main()
Deform Marker#
Marker Deformation is a process of offsetting a Marker’s 2D position at specific times, and allowing higher-frequency positional data to flow in-between the specific times.
Usage:
Select Marker nodes.
Run ‘Deform Create’ tool.
The selected Marker nodes are added into the Deform mode.
A new Maya Animation Layer is created if it does not exist.
Modify the Marker node’s 2D position.
Select Marker node(s).
Run ‘Deform Bake’ tool.
Sets keys for the Marker’s 2D position deformation.
Run ‘Deform Remove’ tool
Removes the Deformation Maya Animation Layer.
Run this Python command:
import mmSolver.tools.deformmarker.tool as tool

# Deform Create
tool.create_offset_layer()

# Deform Bake
tool.bake_offset()

# Deform Remove
tool.remove_layer_override()
Show / Hide Deviation Curves#
Show and Hide the Deviation (error level) curves that is saved on the Marker nodes.
Select Marker nodes.
Run ‘Show Deviation Curves’ tool.
The Maya Graph Editor will be displayed, with only deviation curves visible.
Once you are finished reviewing the Marker Deviation curves, run ‘Hide Deviation Curves’ tool to revert the Maya Graph Editor to normal visibility.
Run this Python command:
import mmSolver.tools.showdeviationcurves.tool as tool

# Show Deviation Curves
tool.show_deviation()

# Hide Deviation Curves
tool.hide_deviation()