Viewport Renderers#
MM Solver comes with specialised Viewport 2.0 renderers designed to add helpful features for use with MatchMove workflows and reviews.

Viewport 2.0 “Renderer” menu.#
Currently the following Viewport 2.0 renderers are available.
Name |
Description |
|---|---|
Identical to default “Viewport 2.0”, but correctly works with MM ImagePlane nodes in from hold-outs, either using Hold Out attributes or Use Background shaders. |
|
Identical to MM Standard Renderer, but adds a silhouette outline edge to all rendered meshes in the viewport. |
MM Standard Renderer#
MM Standard Renderer is a Viewport 2.0 renderer designed to add helpful features for use with MatchMove workflows and reviews.
MM Standard Renderer is different from regular Viewport 2.0 because it can display MM Image Plane nodes with native useBackground shaders (or Hold-Out geometry).
Usage#
1) To use MM Standard Renderer, load the mmSolver plug-in (for
example open the Solver UI to ensure the plug-in is loaded), then use
the Viewport’s “Renderer” menu to switch to MM Standard Renderer.

Enable MM Standard Renderer in the Viewport “Renderer” menu.#
Use the Maya viewport and playblast as normal.
MM Silhouette Renderer#
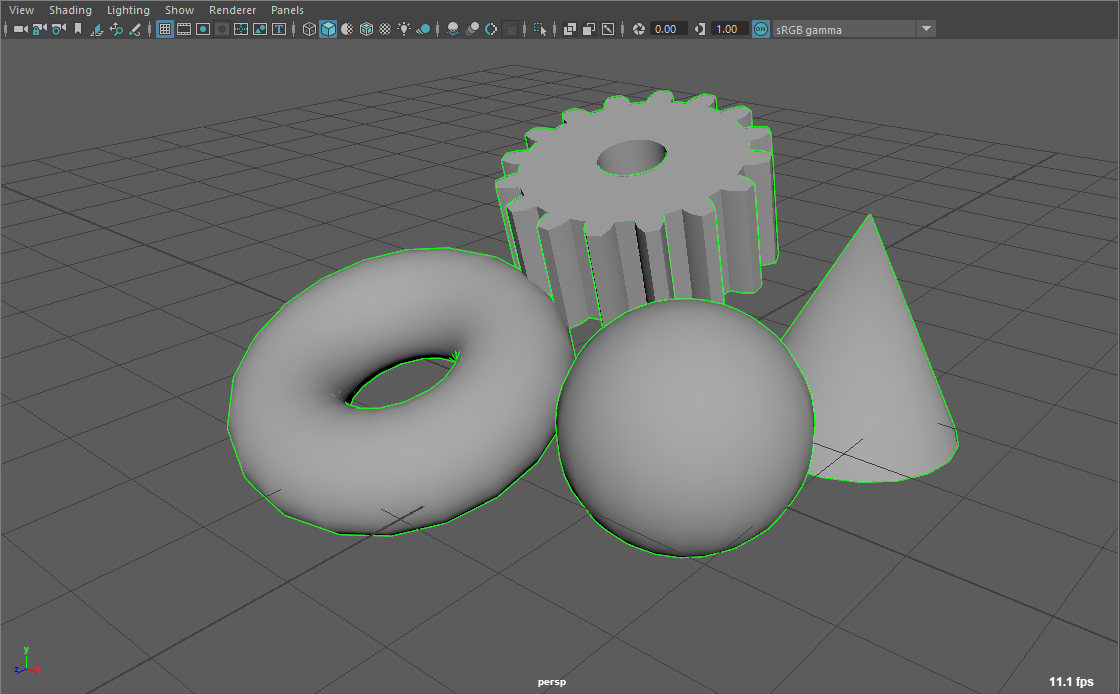
The MM Silhouette Renderer is used to add silhouette outline edge to rendered geometry, allowing the artist to clearly see the edges of a mesh against an image sequence.
This rendering effect is particularly effective when the geometry contains a Hold-Out effect using a useBackground shader or hold-out attributes (see Set Mesh Hold-Out tool).

Example green silhouette effect on shaded objects.#
Note
MM Silhouette Renderer requires the use of the OpenGL graphics API backend; DirectX is not supported, if you are using DirectX please switch your Maya Preferences to use “OpenGL Core Profile”.
Usage#
1) To use MM Silhouette Renderer, load the mmSolver plug-in (for
example open the Solver UI to ensure the plug-in is loaded), then use
the Viewport’s “Renderer” menu to switch to MM Silhouette
Renderer.

Enable MM Silhouette Renderer in the Viewport “Renderer” menu.#
Click viewport panel menu “Renderer > MM Silhouette Renderer [Option Box]” to open the renderer settings in the Attribute Editor.
Adjust Silhouette settings as needed for desired effect.
Use the Maya viewport and playblast as normal.
Settings#
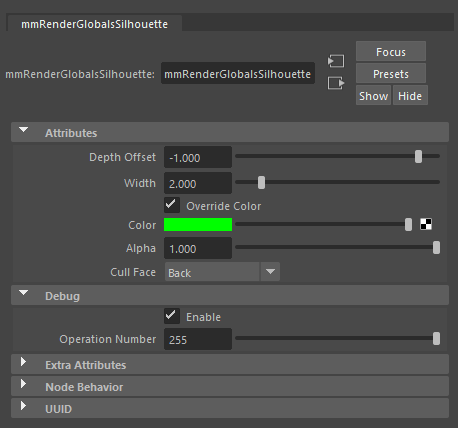
The settings for the MM Silhouette Renderer affect all open viewport panels using the same renderer and allow adjusting the silhouette effect, including the color and opacity.

The global settings for the MM Silhouette Renderer in the Attribute Editor.#
Name |
Description |
|---|---|
Depth Offset |
The separation between the invisible solid geometry and the
wireframe mesh. Adjust to lower values if small-mesh artifacts
are visible. Set to |
Width |
The width of the silhouette lines. |
Override Color |
When enabled, all objects will use the silhouette color below. When disabled, the wireframe color of the object is used for each object’s lines. |
Color |
The override color for silhouette lines. |
Alpha |
The global opacity of the silhouette lines. |
Cull Face |
Backface culling for solid invisible mesh surfaces. For meshes
with inverted normals values other than |
(debug) Enable |
Toggle the silhouette effect on/off. |
(debug) Operation Number |
Used internally to draw only the first N number of rendering operations inside the renderer. |