Input/Output Tools#
The tools on this page are used to import and export data from Maya using MM Solver.
Load Markers#
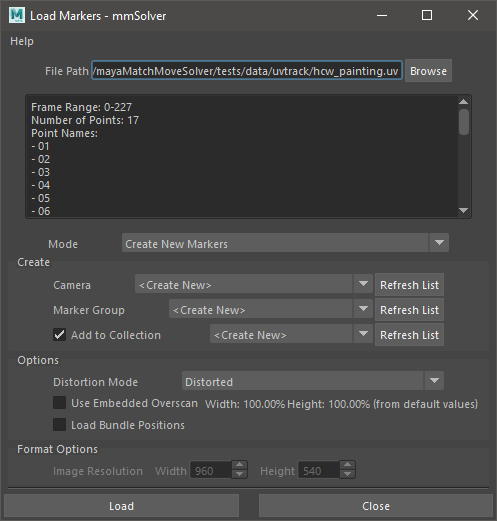
Load Markers UI#
The Load Markers UI allows loading of .uv (mmSolver), .txt
(3DEqualizer4), .rz2 (Autodesk MatchMover), .txt / .2dt
(PFTrack) formatted files.
When opening the UI, the contents of the user’s clipboard is queried. If the clipboard is a valid file path, it will be automatically pasted into the “File Path”, so you won’t need to “Browse” for the file.
In 3DEqualizer, the Copy 2D Tracks (MM Solver) is used to copy
the selected 2D points to a temporary file path and then place that
file path on the clipboard automatically. Once the file path is on the
clipboard, open the Maya Load Marker tool and the path will be
read automatically.
In Blender the Motion Clip Editor sidebar contains a MM Solver
panel, with a Copy and Export 2D Tracks tool.
The Camera list contains all the cameras currently in the Maya
scene. If no cameras are available (persp, front, top, left do not
count), the default option is to create a new camera. The Update
button refreshes the Camera list without needing to close and
re-open the UI.
For 3DEqualizer .txt and PFTrack .txt / .2dt formats you will
need to enter the Width / Height of the input format.
Once a file path is given, press the Load button.
Run this Python command:
import mmSolver.tools.loadmarker.ui.loadmarker_window as tool
tool.main()
Copy 2D Tracks from 3DEqualizer#
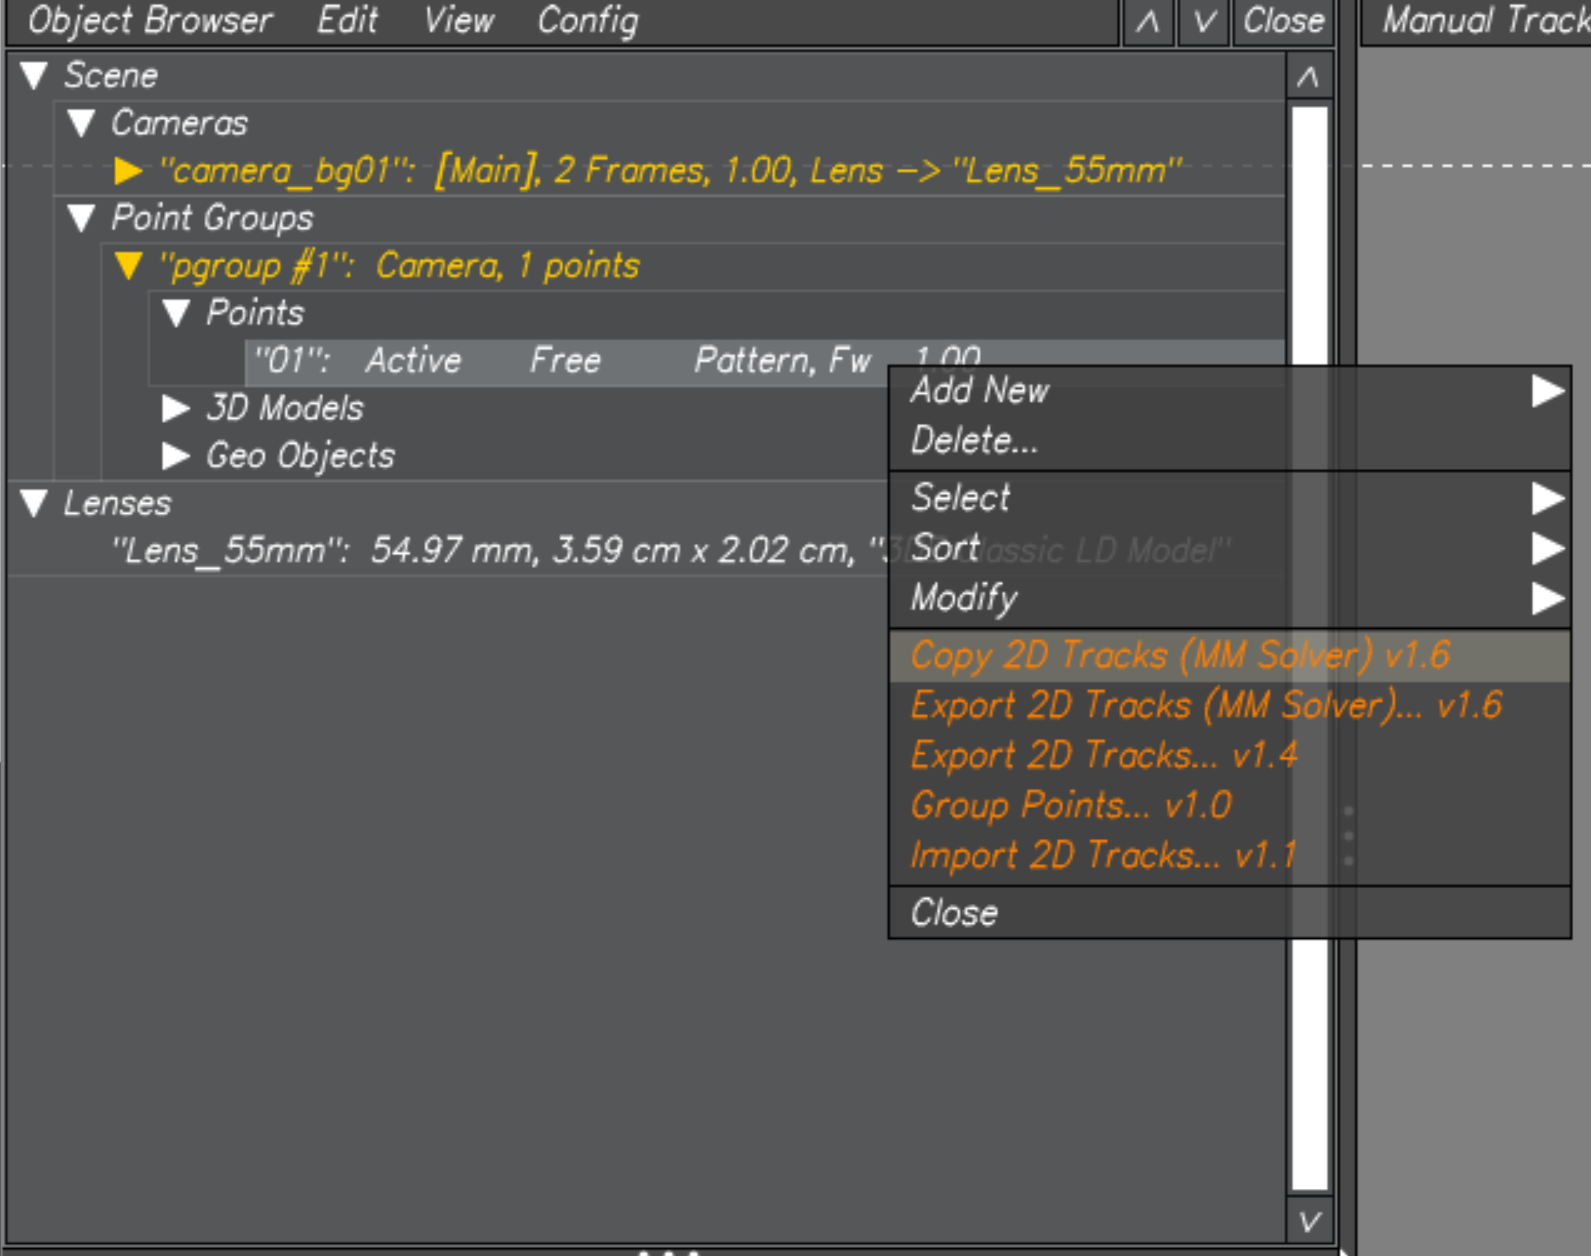
To create a .uv file, you may use the 3DEqualizer Copy 2D Tracks
(MM Solver) script (see mmSolver installation to install this
script).
The Copy 2D Tracks (MM Solver) is almost identical to the Export
2D Tracks (MM Solver) tool. The Copy 2D Tracks (MM Solver) tool
will perform run the Export tool with default UI values, save the
contents a temporary file, and set the OS Copy/Paste buffer to the
saved file path.
In 3DEqualizer, select a 2D Point in the Object or Point Browser.
Right-click the point and run
Copy 2D Tracks (MM Solver).A
.uvfile will be saved into a temporary file, and the file path will be on your system copy/paste clipboard, ready to be used in Maya.
Next Open Maya and use the file path in the Load Markers UI.
See the video tutorial Using 3DEqualizer with mmSolver - Copy 2D Tracks for a step-by-step example of the tool.
2D Tracks Rolling Shutter Correction#
In 3DEqualizer4 with a Rolling Shutter (RS) enabled camera, the Copy 2D
Tracks (MM Solver) and Export 2D Tracks (MM Solver) (version
v1.8+) tools will export the 2D data with RS correction.
When exporting RS in 3DEqualizer4 Release 6, the (Visualisation
Only) Content Distance camera parameter is used for the RS
correction calculation.
In 3DEqualizer4 Release 5 and below, the Content Distance defaults
to 100 units. In 3DEqualizer4 Release 2 and above, to change the
default Content Distance you can add a special tag to the Project
Notes. On a new line, type RS Content Distance = 42.0 (with your
choice of number) into the Attribute Editor’s Project tab, Project
Notes field. This value will be remembered as your preference for the
current 3DEqualizer scene file.
To automatically set the Project Notes with RS Content Distance =
42.0 you may optionally use the Export 2D Tracks (MM Solver)
tool with a Content Distance value of choice which will be saved
into Project Notes and remembered.
Note
To export 2D Tracks with RS correction with 3DEqualizer4 Release 1
or 2, it is recommend to use Export 2D Tracks (MM Solver),
because the Copy 2D Tracks (MM Solver) tool can only export
with the default Content Distance of 100 units.
Copy 2D Tracks from Blender#
It is possible to use Blender (v2.80+) to track 2D Markers for use in mmSolver.
Install the
mmSolver_blender_addon.zipadd-on file from theblenderdirectory of the MM Solver download.Simply open the Addons preferences; “Edit > Preferences > Add-ons”, click “Install…” and browse to the
mmSolver_blender_addon.zip.See the Blender Addons documentation.
In Blender, open the
Motion Clip Editorand make sure the(right-side) Sidebar > Footage > Start Framevalue is set to the first frame number in the image sequence you will track.For example, if the file of your image sequence is
image.1001.jpg, use a Start Frame number of 1001.This is important because all mmSolver importers and exporters will assume the alignment of the 2D Tracking numbers to the the frame range of the tracked image sequence.
In the
Motion Clip Editor, track 2D points as needed using Blenders 2D tracking tool set.Select the 2D Track points you wish to copy/export.
Go to the
Motion Clip Editor > (right-side) Sidebar > Track > MM Solverpanel, then clickCopy 2D Tracks.This will export the selected 2D tracks to a temporary .uv file and then save the file path on your copy-paste buffer (ready for “CTRL + V”).
Open Maya, and open the
Load Markertool (menummSolver > Load Marker...), and pressLoad.For more details, see Load Markers in Maya.
Alternatively you can load the generated
.uvfile into 3DEqualizer using theImport Tracks (MM Solver)tool provided with mmSolver.
Note
When loading 2D Tracks from Blender, change the Distortion
Mode to distort, because Blender does not support
undistorting 2D tracks.
Note
There are some important limitations in the add-on provided.
Cameras cannot have animated focal lengths inside the Motion Clip Editor. Therefore it is recommended not to use the “overscan” feature of the
Load Markertool in Maya.There is no Python function to undistort 2D data. Therefore when tracking with Blender you must solve for lens distortion inside mmSolver and use the MM Image Plane to preview lens (un)distortion.
Note
Blender versions 2.83.18 LTS, 2.93.6 LTS, and v3.0.0 are known to work, other Blender versions with-in the same minor release will likely work, but have not been tested.
Loading Markers in Maya#
Loading Markers into Maya from external Tracking software is a common task needed for solving 3D objects and cameras.
Open the Load Marker UI, for example use the menu
mmSolver > Load Marker....If you already have a valid file path on your Copy/Paste Clipboard, then the Load Marker UI will auto-load the file path.
The file contents will be displayed below the file path.
Choose your options.
Press the Load button.
When the Load button is run, the options used in the Load Marker UI will be saved to the user’s home directory. The saved options are automatically restored when the Load Marker UI is re-opened.
Option |
Description |
|---|---|
Mode |
allows you to create new Markers or replace data on selected Markers. |
Rename Markers |
will run the Marker Bundle Rename tool on the loaded markers with the given name. |
Camera |
is the camera node you wish to place the newly created Markers under. You may also create a new camera node. |
Marker Group |
is the Marker Group (under the Camera) that you wish to
create the Markers underneath. You may create a new Marker
Group, using the |
Distortion Mode |
will allow choosing the type of 2D point data to create or
load. Some formats (for example |
Use Embedded Overscan |
will use the camera field of view (FOV) embedded inside the
file to automatically calculate the correct 2D
position. |
Load Bundle Positions |
will allow loading 3D point information saved along with the 2D
Marker data. Only some formats (for example |
Bundle Space |
sets which space to set Bundle positions in; |
Image Resolution |
is for use with 3DEqualizer4 |
Updating / Replacing Markers in Maya#
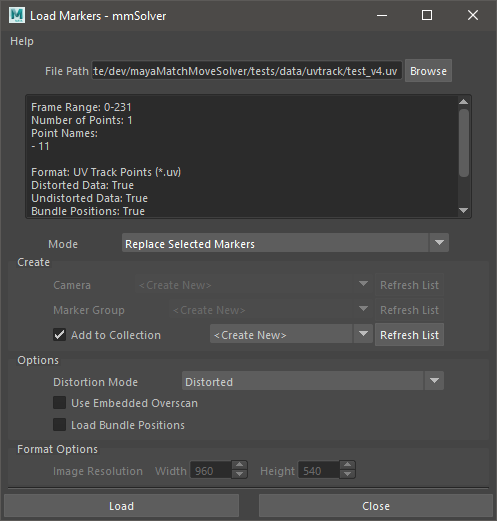
Replace the selected Marker nodes.#
Marker nodes in Maya can be overwritten with newly tracked data.
Open the Load Marker UI.
Set the File Path for the UI.
Change Mode to Replace Selected Markers.
Select Marker nodes using the Maya Outliner.
Press Load button.
The Selected Markers will be considered for update.
If you have select one Marker node, and the loaded file contains one 2D Track, then the 2D Track data will overwrite the selected Marker node.
If you have multiple Marker nodes, selected then the Load Marker tool will try to match the pre-existing Marker name or metadata with the 2D Tracking data in the file. When using 3DEqualizer the 2D Tracking data is loaded onto the Marker node that was already loaded using 3DEqualizer - there is a link between the 2D data in 3DEqualizer and the Marker node in Maya.
Save Marker#
Saves 2D Markers into a .uv file that can be loaded into MM
Solver (or any other software that supports the MM Solver .uv
format).
Usage:
Select Marker nodes.
Run tool.
Browse with the Save dialog UI presented.
To run the tool, use this Python command:
import mmSolver.tools.savemarkerfile.tool as tool
tool.main()
Copy Marker to Clipboard#
Saves the selected Marker node into a temporary file and saves the file path onto the OS Copy/Paste clipboard.
Usage:
Select a Maya Marker node.
Run tool.
Open software or tool supporting loading Markers in
.uvformat, such as the Load Markers tool.
To run the tool, use this Python command:
import mmSolver.tools.copypastemarker.tool as tool
tool.main()
Copy Camera to Clipboard#
Saves the selected camera node into a temporary file and saves the file path onto the OS Copy/Paste clipboard.
Usage:
Select a Maya camera.
Run tool.
Open 3DEqualizer.
Select Camera in Object Browser.
Right-click and run
Paste Camera (MM Solver)....
To run the tool, use this Python command:
import mmSolver.tools.copypastecamera.tool as tool
tool.main()
Load Lens File On Selected Nodes#
Load the attributes of a Lens using a .nk file. Files supporting
static and animated values is supported.
The .nk files given to MM Solver are expected to be saved with
the Save Lens File tool or saved with the
3DEqualizer Export Nuke Lens Distortion tool.
Usage:
Select Lens node.
Run tool, a browse dialog UI will be displayed.
Browse to a file and press “Open”.
The file will be read and values will be set on the Lens node.
To run the tool, use this Python command:
import mmSolver.tools.loadlens.tool as tool
tool.main()
Save Lens File#
Save the values on a Lens node into a .nk file. Both static and
animated attributes are saved.
Usage:
Select Lens node.
Run tool, a browse dialog UI will be displayed.
Browse to a file and press “Save”.
The node values will written to the file.
To run the tool, use this Python command:
import mmSolver.tools.savelensfile.tool as tool
tool.main()